Using Lens to inspect a Kubernetes minikube cluster on WSL
1. A bit of context
1.1 Lens
Lens is like a Kubernetes (K8s) IDE, with the app you can monitor and interact with K8s clusters using a graphical user interface (GUI). See Video 1 for an intro on that desktop app.
Video 1 - Introduction to Lens.
In the context of this tutorial, we installed Lens on Windows 11.
1.2 Minikube
Minikube is an easy way to have a local K8s cluster running on your computer, all you need is Docker container or some similar tool, and kubectl. For a quick intro to this tool check Video 2.
Video 2 - Minikube and Kubectl explained.
Note: TechWorld with Nana is an amazing channel! Check it out if you are interested in DevOps.
In the context of this tutorial we installed minikube on WSL, so we followed the Linux installation guide from the minikube website.
After running the minikube start command you can check if you are using Docker, the containers that represent your K8s with:
➜  ~ docker ps
CONTAINER ID   IMAGE                                 COMMAND                  CREATED       STATUS         PORTS                                                                                                                                  NAMES
1536bce200c   gcr.io/k8s-minikube/kicbase:v0.0.33   "/usr/local/bin/entr…"   2 weeks ago   Up 2 minutes   127.0.0.1:49157->22/tcp, 127.0.0.1:49156->2376/tcp, 127.0.0.1:49155->5000/tcp, 127.0.0.1:49154->8443/tcp, 127.0.0.1:49153->32443/tcp   minikube
And with kubectl you can check the nodes too:
➜  ~ kubectl get nodes
NAME       STATUS   ROLES           AGE   VERSION
minikube   Ready    control-plane   20d   v1.24.3
You may want to change your kubectl context if you have multiple clusters configured, for example:
➜  ~ kubectl config get-contexts # get available contexts
CURRENT   NAME                         CLUSTER                      AUTHINFO                                                       NAMESPACE
          minikube                     minikube                     minikube                                                       default
*         other-cluster                other-cluster                clusterUser_k8s_other-cluster
➜  ~ kubectl config use-context minikube # in this example, changes the context from 'other-cluster' to 'minikube'
Switched to context "minikube".
Also, you may simulate a multi-node K8s instance with minikube if you want to test a multi-node deployment (when we talk about databases, it is a good practice to have at least 3 instances in different nodes for robustness to node failure). You can create a new multi-node cluster/profile by running:
minikube start --nodes <number-of-nodes> --profile <name-of-new-profile>
(click to expand) Example run
➜  ~ minikube start --nodes 3 --profile multinode3
😄  [multinode3] minikube v1.27.0 on Ubuntu 20.04 (amd64)
❗  Kubernetes 1.25.0 has a known issue with resolv.conf. minikube is using a workaround that should work for most use cases.
❗  For more information, see: https://github.com/kubernetes/kubernetes/issues/112135
✨  Automatically selected the docker driver
📌  Using Docker driver with root privileges
👍  Starting control plane node multinode3 in cluster multinode3
🚜  Pulling base image ...
🔥  Creating docker container (CPUs=2, Memory=2200MB) ...
🐳  Preparing Kubernetes v1.25.0 on Docker 20.10.17 ...
    ▪ Generating certificates and keys ...
    ▪ Booting up control plane ...
    ▪ Configuring RBAC rules ...
🔗  Configuring CNI (Container Networking Interface) ...
🔎  Verifying Kubernetes components...
    ▪ Using image gcr.io/k8s-minikube/storage-provisioner:v5
🌟  Enabled addons: storage-provisioner, default-storageclass

👍  Starting worker node multinode3-m02 in cluster multinode3
🚜  Pulling base image ...
🔥  Creating docker container (CPUs=2, Memory=2200MB) ...
🌐  Found network options:
    ▪ NO_PROXY=192.153.27.2
🐳  Preparing Kubernetes v1.25.0 on Docker 20.10.17 ...
    ▪ env NO_PROXY=192.153.27.2
🔎  Verifying Kubernetes components...

👍  Starting worker node multinode3-m03 in cluster multinode3
🚜  Pulling base image ...
🔥  Creating docker container (CPUs=2, Memory=2200MB) ...
🌐  Found network options:
    ▪ NO_PROXY=192.153.27.2,192.153.27.3
🐳  Preparing Kubernetes v1.25.0 on Docker 20.10.17 ...
    ▪ env NO_PROXY=192.153.27.2
    ▪ env NO_PROXY=192.153.27.2,192.168.27.3
🔎  Verifying Kubernetes components...
🏄  Done! kubectl is now configured to use "multinode3" cluster and "default" namespace by default
You may check your multiple profiles with minikube profile list, change profile with minikube profile <profile-name>, and run specific actions to profiles by adding -p <profile-name> to the end of the command. (click to expand) Example run
➜  ~ minikube profile list
|------------|-----------|---------|--------------|------|---------|---------|-------|--------|
|  Profile   | VM Driver | Runtime |      IP      | Port | Version | Status  | Nodes | Active |
|------------|-----------|---------|--------------|------|---------|---------|-------|--------|
| minikube   | docker    | docker  | 192.153.49.2 | 8443 | v1.24.3 | Running |     1 | *      |
| multinode3 | docker    | docker  | 192.153.85.2 | 8443 | v1.25.0 | Running |     3 |        |
|------------|-----------|---------|--------------|------|---------|---------|-------|--------|
➜  ~ minikube stop -p minikube # stoping the cluster of the 'minikube' profile
✋  Stopping node "minikube"  ...
🛑  Powering off "minikube" via SSH ...
🛑  1 node stopped.
➜  ~ minikube profile multinode3 # changing current profile
✅  minikube profile was successfully set to multinode3
➜  ~ minikube profile list
|------------|-----------|---------|--------------|------|---------|---------|-------|--------|
|  Profile   | VM Driver | Runtime |      IP      | Port | Version | Status  | Nodes | Active |
|------------|-----------|---------|--------------|------|---------|---------|-------|--------|
| minikube   | docker    | docker  | 192.153.49.2 | 8443 | v1.24.3 | Stopped |     1 |        |
| multinode3 | docker    | docker  | 192.153.85.2 | 8443 | v1.25.0 | Running |     3 | *      |
|------------|-----------|---------|--------------|------|---------|---------|-------|--------|
And you may see your kubectl available contexts with the command kubectl config get-contexts and take a look at the new nodes with kubectl get nodes. (click to expand) Example run
➜  ~ kubectl config get-contexts
CURRENT   NAME                         CLUSTER                      AUTHINFO                                                       NAMESPACE
          minikube                     minikube                     minikube                                                       default
*         multinode3                   multinode3                   multinode3                                                     default
          other-cluster                other-cluster                clusterUser_k8s_other-cluster
➜  ~ kubectl get nodes
NAME             STATUS   ROLES           AGE     VERSION
multinode3       Ready    control-plane   6m27s   v1.25.0
multinode3-m02   Ready    <none>          4m30s   v1.25.0
multinode3-m03   Ready    <none>          3m53s   v1.25.0
Note: Although is possible to run this multi-node test locally it is difficult to work on a modest machine now that we have 3 containers each expecting 2 CPUs and 2 Gb of RAM ![]() .
.
1.3 WSL
I’ve made a quick intro about it on an older post, but you can go straight to this quick video intro. Basically, WSL is a tool to have a Linux developer environment on your Windows PC.
2. Using Lens to inspect a Kubernetes minikube cluster on WSL
Wait! Couldn’t I just use minikube dashboard instead?
Yes, minikube comes with a dashboard (see Figure 1) so you can look up your local K8s cluster and interact with it, but the idea of using Lens is to have the same tool for interacting with the local cluster and with a production cluster in a cloud provider.
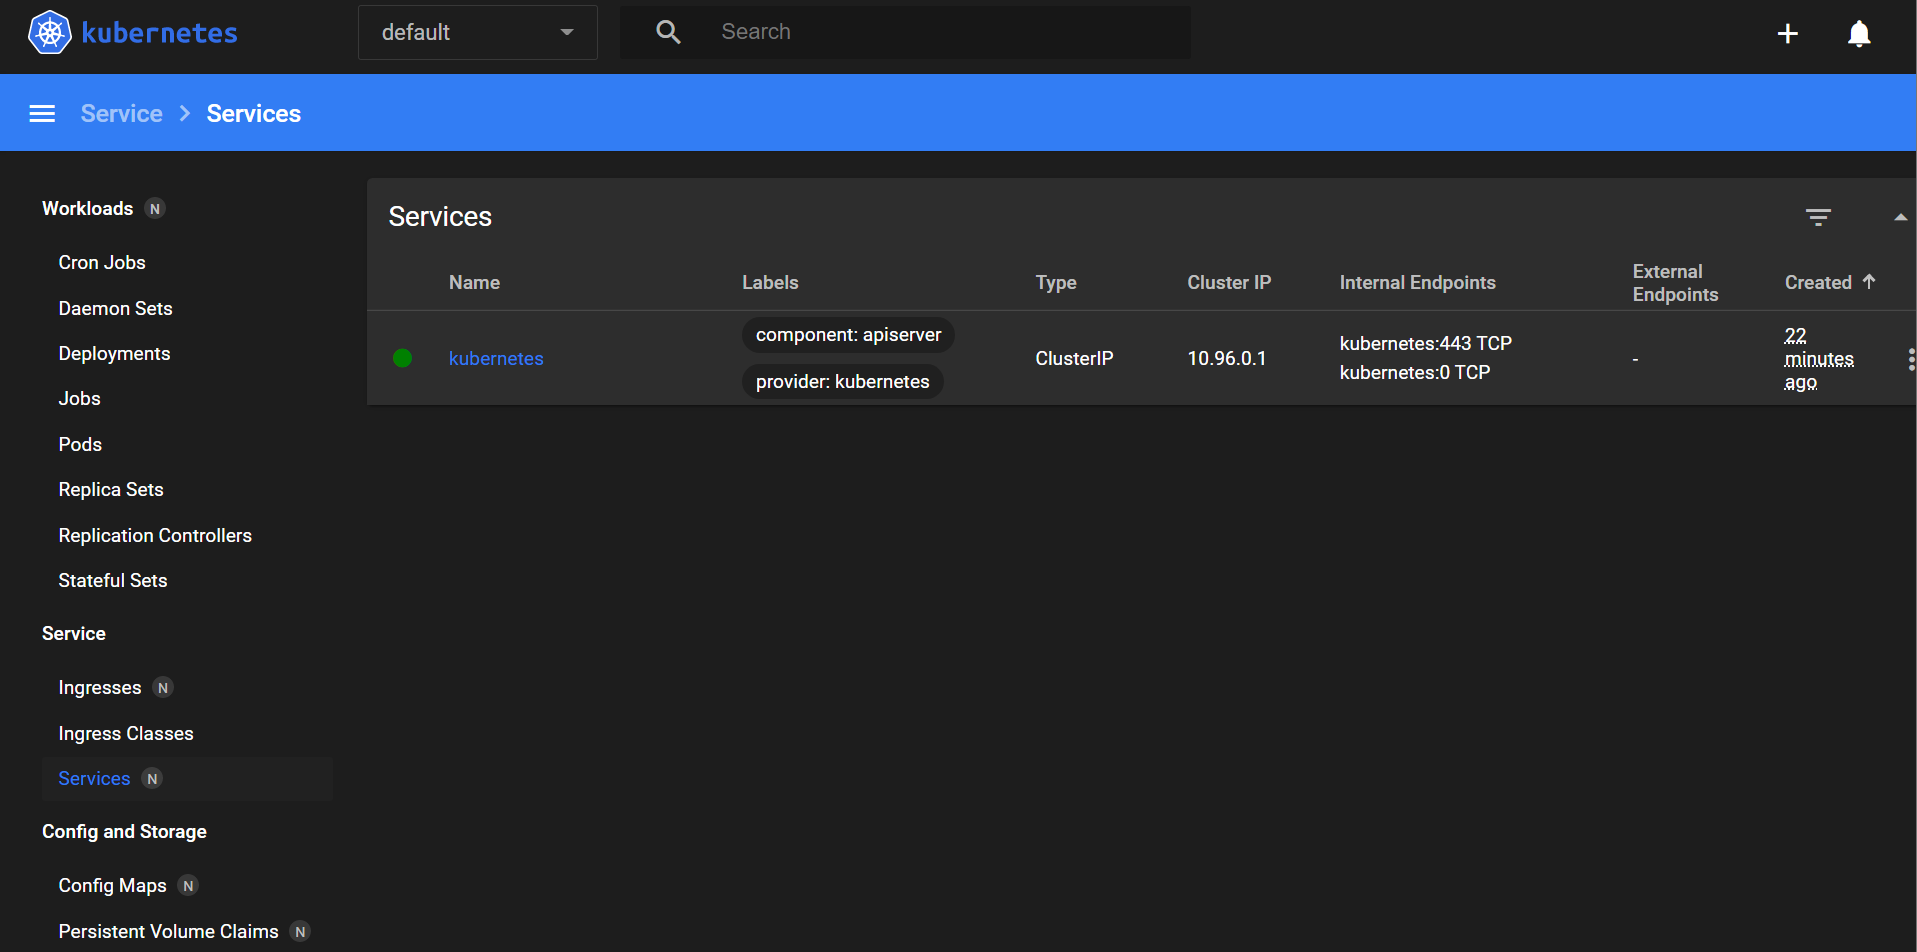
First, check if your cluster is running with minikube status command, if no cluster is running you can spin one up with the minikube start command. (click to expand) Example run
➜  ~ minikube status
multinode3
type: Control Plane
host: Running
kubelet: Running
apiserver: Running
kubeconfig: Configured

multinode3-m02
type: Worker
host: Running
kubelet: Running

multinode3-m03
type: Worker
host: Running
kubelet: Running
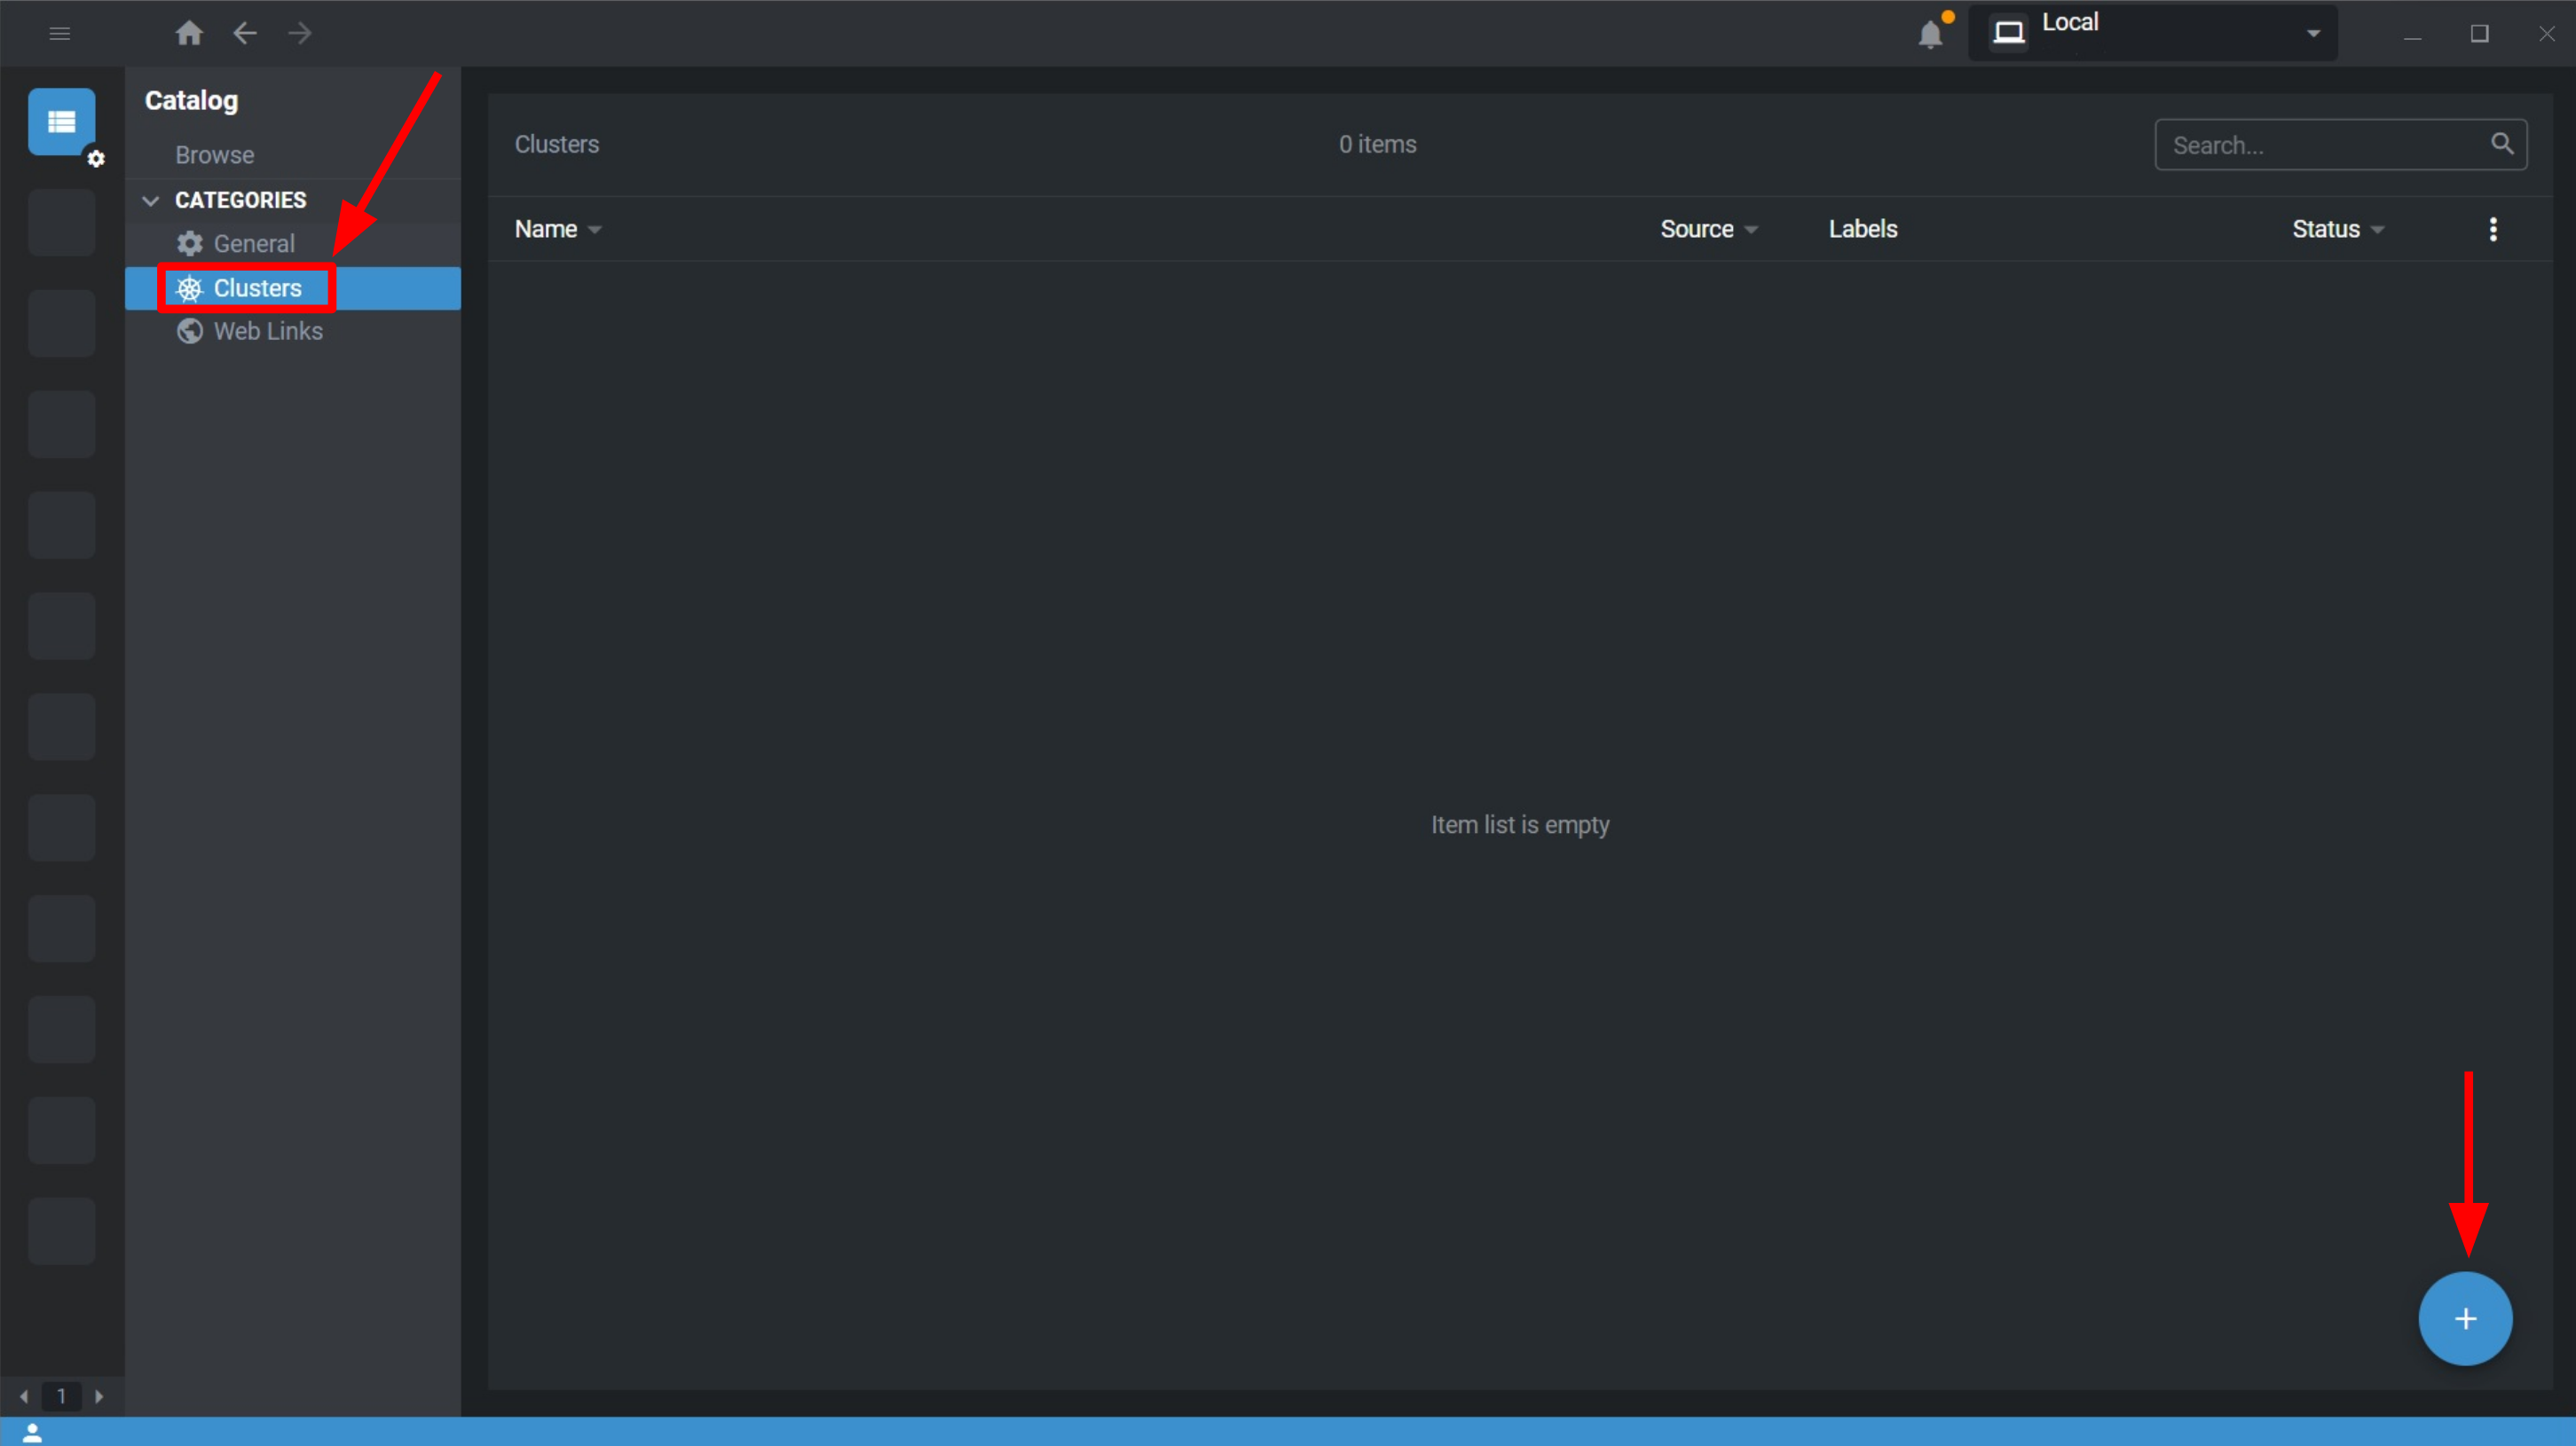
If you still don’t have it, download and install Lens. Start it and go the the “Cluster” tab as shown by the left arrow in Figure 2 and then click on the plus sign pointed by the right arrow. Figure 3 shows the possible ways to add clusters to Lens.
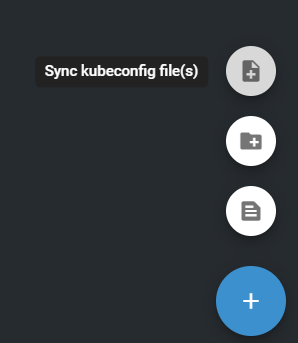
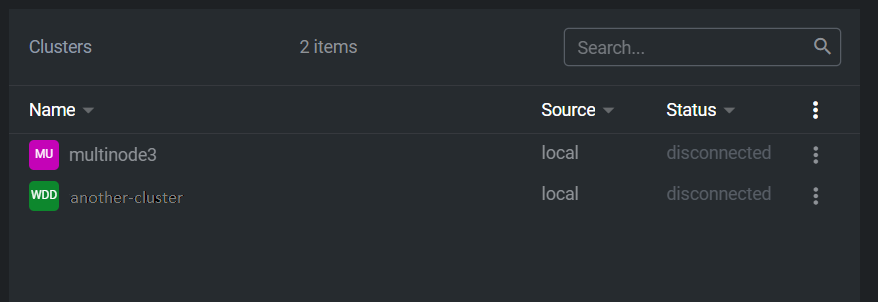
Here comes the problem, you may want to sync the kubeconfig file that you can find in a path like this: \\wsl.localhost\Ubuntu-20.04\home\romulo\.kube\config when using the first option shown in Figure 3. You shall end up with a list of clusters similar to Figure 4, where in my case I can easily access the second one, a K8s cluster on Azure. The problem lies when trying to access the minikube one, the error in Figure 5 is raised.
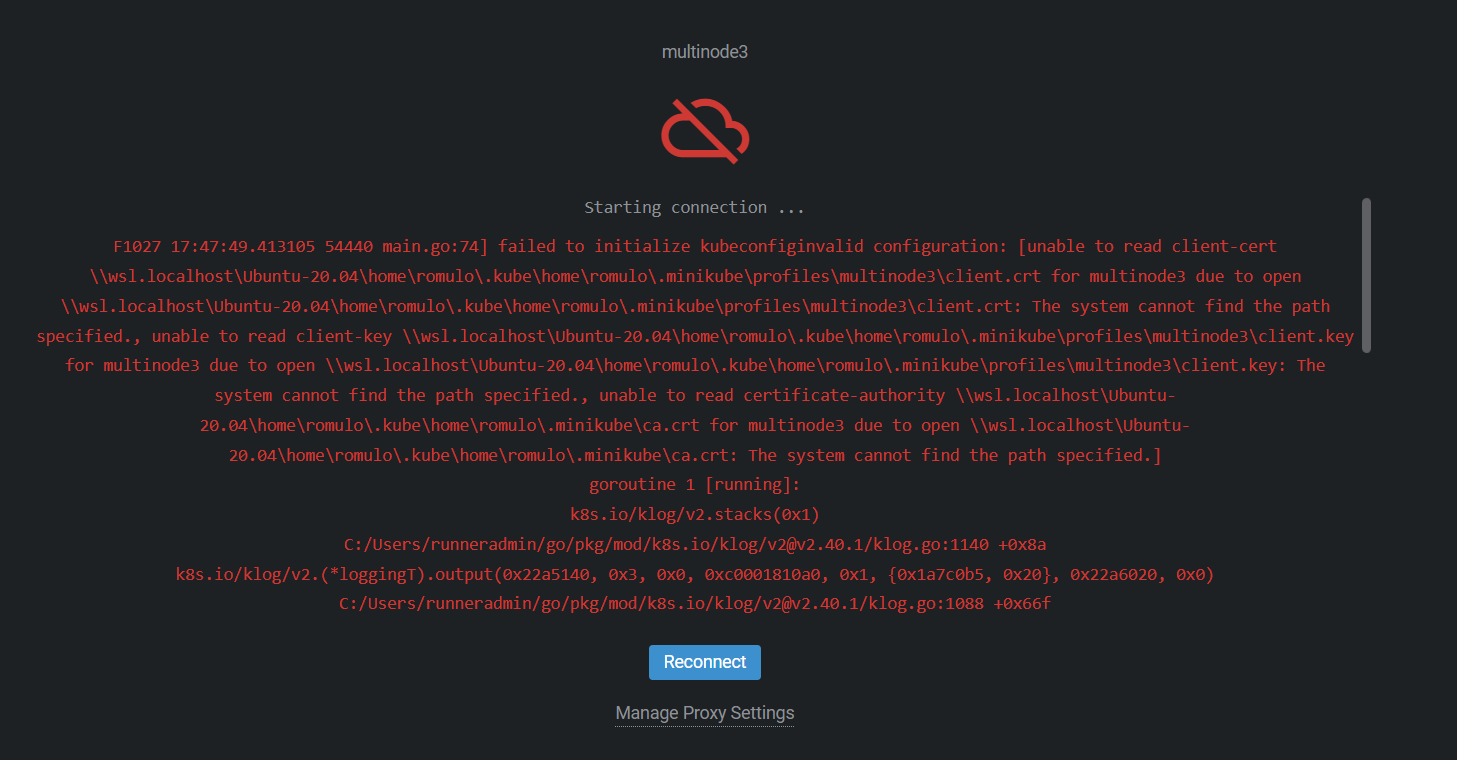
(click to expand) Full error
F1027 17:47:49.413105 54440 main.go:74] failed to initialize kubeconfiginvalid configuration: [unable to read client-cert \\wsl.localhost\Ubuntu-20.04\home\romulo\.kube\home\romulo\.minikube\profiles\multinode3\client.crt for multinode3 due to open \\wsl.localhost\Ubuntu-20.04\home\romulo\.kube\home\romulo\.minikube\profiles\multinode3\client.crt: The system cannot find the path specified., unable to read client-key \\wsl.localhost\Ubuntu-20.04\home\romulo\.kube\home\romulo\.minikube\profiles\multinode3\client.key for multinode3 due to open \\wsl.localhost\Ubuntu-20.04\home\romulo\.kube\home\romulo\.minikube\profiles\multinode3\client.key: The system cannot find the path specified., unable to read certificate-authority \\wsl.localhost\Ubuntu-20.04\home\romulo\.kube\home\romulo\.minikube\ca.crt for multinode3 due to open \\wsl.localhost\Ubuntu-20.04\home\romulo\.kube\home\romulo\.minikube\ca.crt: The system cannot find the path specified.]
goroutine 1 [running]:
k8s.io/klog/v2.stacks(0x1)
C:/Users/runneradmin/go/pkg/mod/k8s.io/klog/v2@v2.40.1/klog.go:1140 +0x8a
k8s.io/klog/v2.(*loggingT).output(0x22a5140, 0x3, 0x0, 0xc0001810a0, 0x1, {0x1a7c0b5, 0x20}, 0x22a6020, 0x0)
C:/Users/runneradmin/go/pkg/mod/k8s.io/klog/v2@v2.40.1/klog.go:1088 +0x66f
k8s.io/klog/v2.(*loggingT).printDepth(0xc000720800, 0x6018, 0x0, {0x0, 0x0}, 0x1, {0xc000386100, 0x2, 0x2})
C:/Users/runneradmin/go/pkg/mod/k8s.io/klog/v2@v2.40.1/klog.go:735 +0x1ae
k8s.io/klog/v2.(*loggingT).print(...)
C:/Users/runneradmin/go/pkg/mod/k8s.io/klog/v2@v2.40.1/klog.go:717
k8s.io/klog/v2.Fatal(...)
C:/Users/runneradmin/go/pkg/mod/k8s.io/klog/v2@v2.40.1/klog.go:1622
main.main()
D:/a/lens-k8s-proxy/lens-k8s-proxy/main.go:74 +0x6a6

goroutine 6 [chan receive]:
k8s.io/klog/v2.(*loggingT).flushDaemon(0x0)
C:/Users/runneradmin/go/pkg/mod/k8s.io/klog/v2@v2.40.1/klog.go:1283 +0x6a
created by k8s.io/klog/v2.init.0
C:/Users/runneradmin/go/pkg/mod/k8s.io/klog/v2@v2.40.1/klog.go:420 +0xfb

goroutine 10 [syscall]:
os/signal.signal_recv()
C:/hostedtoolcache/windows/go/1.17.8/x64/src/runtime/sigqueue.go:169 +0x98
os/signal.loop()
C:/hostedtoolcache/windows/go/1.17.8/x64/src/os/signal/signal_unix.go:24 +0x19
created by os/signal.Notify.func1.1
C:/hostedtoolcache/windows/go/1.17.8/x64/src/os/signal/signal.go:151 +0x2c

proxy exited with code: 255

Failed to start connection: Error: failed to retrieve port from stream
From the error log we can easily see that part of the path is being repeated, e.g. \home\romulo in \\wsl.localhost\Ubuntu-20.04\home\romulo\.kube\home\romulo\.minikube\profiles\multinode3\client.crt.
So, the best approach to deal with this mismatch I’ve found is to make a copy of the ~/.kube/config file to, for example, ~/kubeconfig and delete on this new file all instances of /home/<username>/ (in my case /home/romulo/). This way you don’t mess around with the config file necessary for minikube and kubectl to work properly while you use Lens.
After syncing this new ~/kubeconfig file with Lens, you will still need to update it if your ~/.kube/config changes (possibly by adding/deleting clusters connections). Nevertheless minikube has an annoying behavior: it changes the server port every time the cluster restarts. For example, you may find at the first minikube start a line in the kubeconfig file with server: https://127.0.0.1:49174 and then, after a cluster restart you may see server: https://127.0.0.1:49189. Fortunately, if you are using Docker or Podman to virtualize the cluster, you can set up the port forwarding on the creation of the minikube cluster/profile. You shall run:
minikube delete # to delete old docker containers for the active profile
minikube start --ports=127.0.0.1:55555:8443 # forwarding <server-port-you-want-fixed>:<K8s-default-apiserver-port>
(click to expand) Example run:
➜  ~ minikube delete # to delete old docker containers for the active profile
🔥  Deleting "minikube" in docker ...
🔥  Deleting container "minikube" ...
🔥  Removing /home/romulo/.minikube/machines/minikube ...
💀  Removed all traces of the "minikube" cluster.
➜  ~ minikube start --ports=127.0.0.1:55555:8443 # forwarding <server-port-you-want-fixed>:<K8s-default-apiserver-port>
😄  minikube v1.27.0 on Ubuntu 20.04 (amd64)
❗  Kubernetes 1.25.0 has a known issue with resolv.conf. minikube is using a workaround that should work for most use cases.
❗  For more information, see: https://github.com/kubernetes/kubernetes/issues/112135
✨  Automatically selected the docker driver
📌  Using Docker driver with root privileges
👍  Starting control plane node minikube in cluster minikube
🚜  Pulling base image ...
🔥  Creating docker container (CPUs=2, Memory=2200MB) ...
🐳  Preparing Kubernetes v1.25.0 on Docker 20.10.17 ...
    ▪ Generating certificates and keys ...
    ▪ Booting up control plane ...
    ▪ Configuring RBAC rules ...
🔎  Verifying Kubernetes components...
    ▪ Using image gcr.io/k8s-minikube/storage-provisioner:v5
🌟  Enabled addons: storage-provisioner, default-storageclass
🏄  Done! kubectl is now configured to use "minikube" cluster and "default" namespace by default
Note: The 55555 is an arbitrary port number I’ve chosen (it’s five fives ![]() ) and
) and 8443 is the default API server port for K8s, if you change it you shall change it here too.
Unfortunately, this port fixing trick doesn’t work with multi-node minikube cluster (see PR#9404). If you want to see for yourself try to create a new cluster with minikube start --nodes 3 --profile multinode3 --ports=127.0.0.1:55555:8443 or add a new node to the single node cluster created before with minikube node add. Both of them raise an error due to trying to use the same port forwarding (127.0.0.1:55555:8443) for the worker nodes too. For the case of a multi-node minikube cluster you will need to keep updating the server port every time you want to use Lens and the cluster has been restarted ![]() .
.
I personally maintain a single node profile named minikube with the port forwarding trick and a multi-node one named multinode3. When I want to use Lens with the multi-node one I manually update my ~/kubeconfig file with the new random port.
➜  ~ minikube profile list
|------------|-----------|---------|--------------|------|---------|---------|-------|--------|
|  Profile   | VM Driver | Runtime |      IP      | Port | Version | Status  | Nodes | Active |
|------------|-----------|---------|--------------|------|---------|---------|-------|--------|
| minikube   | docker    | docker  | 192.153.49.2 | 8443 | v1.25.0 | Stopped |     1 | *      |
| multinode3 | docker    | docker  | 192.153.67.2 | 8443 | v1.25.0 | Stopped |     3 |        |
|------------|-----------|---------|--------------|------|---------|---------|-------|--------|